Installing John Deere Disrupters
First, you need to locate positions for lugs so do not remove your grates.
Install the pipe bushings that are supplied on the driver’s side of combine, drop #1 and #3 grate down on both the right and left sides. Leave #2 and #4 grate bolted up tight. There will now be two bumps on the bottom of the grate system for the crop to bounce over. Disrupter lugs install up from the bottom of the grate. Top “L” shaped plate with bolts install down from inside grate with the “L” lip down in between the grate frame and the points of the grate fingers. Tork to 35 foot pounds.
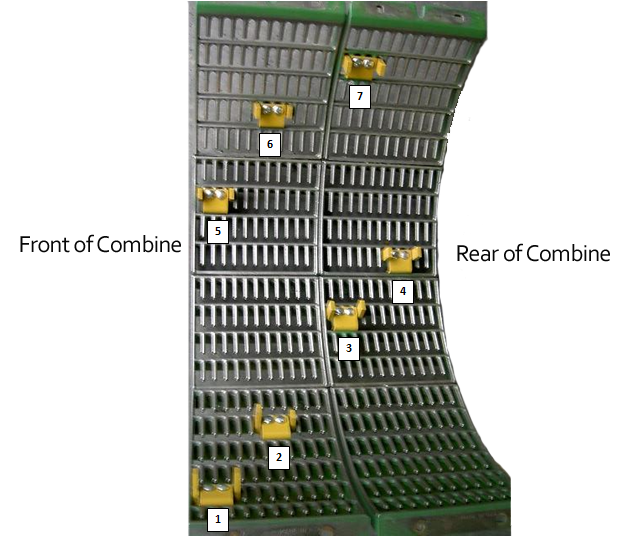
Position of Disrupter lugs in Grate. The first thing to do when installing your lugs is to find a position in the first and second grate only, that the lugs will clear the tines on the rotor. I refer to the first complete grate that starts on the left side of the machine and continues all the way to the right side. I’m not referring to the individual grate sections.
To do this place #1 & #2 lug up by hand up from the outside in the front grate, one to the front of the front grate and one to the rear of the front grate. Turn the rotor over by hand. When you have located the position that the lugs will clear the tines, take a marker and mark the two positions on the grate. Then when you install #1 lug and #2lug they will clear. Notice that #1 lug and #5 lug are in the same row on the front of the front grate. #2 lug and #6 lug are also in the same row to the rear of the front grate. In the #2 and #6 position you might need to use the two lugs with a short leg, so if need be the tine will go directly over the lug. Repeat the same process on the second grate to locate #3 & #4 lug. Lug #3 and Lug #7 will be in the same row. Lug #4 will be on the elevator side
To do the installation, remove the two bolts that hold up the second grate to the frame and remove the top section of the grate to give you an access hole to work from.
From this position you can then install #1-#2-& #3 lug.
#1 lug goes about 5 inches down from the top left of the first grate and #3 lug goes in the belly of the combine in the front part of the second grate. Place #2 lug halfway between #1 & #3 in back of first grate.
Bolt up the second grate and move to the right side of combine. Remove the two bolts that hold up the second grate and remove the top section for your access hole. From this position you can now install #5 lug –#6 lug on front grate and #4 & #7 lug on the back of the second grate.
Also, in all STS and S-series combines, grain cracking problems happens because of the feeder house drive sprocket running too fast, your original equipment sprocket is a 21-26 tooth. This needs to be changed to a 15-21 tooth (John Seere parts number is axe10874). This needs to be run on the 15-tooth sprocket for corn. The 21 tooth side might be fast enough for beans, but you might still use the 21-26 tooth for wheat.
John Deere Disrupter Installation for John Deere STS & S Series Combines
John Deere 9560
John Deere 9570
John Deere 9650
John Deere 9660
John Deere 9670
John Deere 9750
John Deere 9760
John Deere 9770
John Deere 9860
John Deere 9870
John Deere 9870
John Deere S550
John Deere S650
John Deere S660
John Deere S670
John Deere S680
John Deere S690
John Deere S760
John Deere S770
John Deere S780
John Deere S790

